最详细的 Spring Boot 多模块开发与排坑指南
创建项目
创建一个SpringBoot项目非常的简单,简单到这里根本不用再提。你可以在使用IDEA新建项目时直接选择SpringInitlalize创建一个SpringBoot项目,也可以使用Spring官方提供的SpringBoot项目生成页面得到一个项目。
下面介绍一下使用Spring官方生成的方式,如果你已经有了一个SpringBoot项目,这部分可以直接跳过。
打开
填写group和Artifact信息,选择依赖(我选择了SpringWeb和Lombok)。spring官网创建初始项目
打开下载的项目,删除无用的.mvn文件夹,mvnw、、文件。
到这里已经得到了一个SpringBoot初始项目了,我们直接导入到IDEA中,看一眼的内容。
?xmlversion="1.0"encoding="UTF-8"?projectxmlns=""xmlns:xsi=""xsi:schemaLocation=""//groupIdartifactIdspring-boot-starter-parent//versionrelativePath/!--lookupparentfromrepository--//groupIdartifactIdspringboot-module-demo//versionnamespringboot-module-demo/namedescriptionDemoprojectforSpringBoot////groupIdartifactIdspring-boot-starter-web/artifactId//groupIdartifactIdlombok/artifactIdoptionaltrue/optional//groupIdartifactIdspring-boot-starter-test/artifactIdscopetest//groupIdartifactIdjunit-vintage-engine/artifactId/exclusion/exclusions/depency//groupIdartifactIdspring-boot-maven-plugin/artifactId/plugin/plugins/build/project
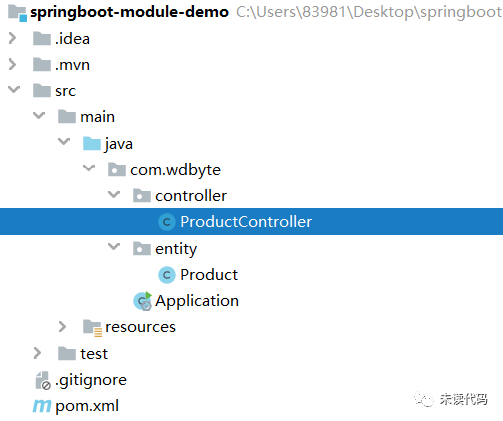
把目录结构调整成自己想要的结构,然后添加controller和entity用于测试。
项目目录结构
ProductController类源代码。
@RestController@RequestMapping("/product")publicclassProductController{/***获取商品列表**@return*/@GetMapping("/list")publicMaplist(){//模拟查询商品逻辑Productproduct=newProduct();("小米粥");(newBigDecimal(2.0));(100);MapString,ObjectresultMap=newHashMap();("code",000);("message","成功");("data",(product));returnresultMap;}}Product类源代码。
@DatapublicclassProduct{/**商品名称.*/privateStringproductName;/**商品价格.*/privateBigDecimalproductPrice;/**商品库存。*/privateintproductStock;}模块化借助IDEA工具可以快速的把项目改造成maven多模块,这里我们把准备测试demo拆分为common和web两个模块,common模块存放实体类。web模块存放controller层(这里项目虽小,拆分只是为了演示)。话不多说,直接开始。
配置主打包方式为pom?xmlversion="1.0"encoding="UTF-8"?
projectxmlns=""xmlns:xsi=""
xsi:schemaLocation=""
/modelVersion
!--配置主pom打包方式为pom--
packagingpom/packaging
.
.
创建common模块项目直接new-module。创建模块选择maven-next,填写模块名称。填写模块名称继续next完成模块创建。
创建web模块web模块的创建和common模块如出一辙,不再赘述。完成两个模块的创建之后,你会发现你的主文件里自动添加了module部分。modules
moduleproduct-common/module
moduleproduct-web/module
/modules
移动代码到指定模块移动到product-common模块,其他部分代码和resource部分直接移动到product-web模块,移动完后你的代码结构是这个样子。多模块目录结构
到这里,多模块已经拆分完成了,但是ProductController代码里的红色警告让你发现事情还没有结束。
依赖管理处理依赖问题你发现了代码里的红色警告,不过你也瞬间想到了是因为把Product类移动到了product-common模块,导致这里引用不到了。
红色警告
然后你查看了下product-common模块的里的内容。
?xmlversion="1.0"encoding="UTF-8"?projectxmlns=""xmlns:xsi=""xsi:schemaLocation=""parentartifactIdspringboot-module-demo///version//modelVersionartifactIdproduct-common/artifactId/project
机智的在Product-web模块的里引入product-common,手起键落,轻松搞定。
?xmlversion="1.0"encoding="UTF-8"?projectxmlns=""xmlns:xsi=""xsi:schemaLocation=""parentartifactIdspringboot-module-demo///version//modelVersionartifactIdproduct-web//groupIdartifactIdproduct-common/artifactId/depency/depencies/project
不过你还是迅速定位了问题,查看maven依赖,你发现是因为没有指定product-common依赖的版本号。
报错信息
原来如此,因为没有指定版本号,我们指定上不就完事了嘛。在最外层的主中添加depencyManagement添加上指定依赖和要指定的版本号。
/groupIdartifactIdproduct-common//version!--maven打包默认0.0.1-SNAPSHOT版本--/depency/depencies/depencyManagement
刷新maven,发现项目已经不报错了,编译成功,运行启动类,熟悉的Springlogo又出现在眼前。
优化依赖是的,SpringBoot应用在改造成多模块后成功运行了起来,但是你貌似发现一个问题,模块common和模块web都继承了主pom,主pom中有Lombok、SpringBootWeb和SpringBootTest依赖,而common模块里只用到了Lombok啊,却一样继承了SpringBoot其他依赖,看来还是要改造一把。
只有common模块用到的依赖移动到common模块。?xmlversion="1.0"encoding="UTF-8"?
projectxmlns=""
xmlns:xsi=""
xsi:schemaLocation=""
parent
artifactIdspringboot-module-demo/artifactId
/groupId
/version
/parent
/modelVersion
artifactIdproduct-common/artifactId
depencies
depency
/groupId
artifactIdlombok/artifactId
optionaltrue/optional
/depency
/depencies
/project
只有web模块用到的依赖移动到web模块。?xmlversion="1.0"encoding="UTF-8"?
projectxmlns=""
xmlns:xsi=""
xsi:schemaLocation=""
parent
artifactIdspringboot-module-demo/artifactId
/groupId
/version
/parent
/modelVersion
artifactIdproduct-web/artifactId
depencies
depency
/groupId
artifactIdproduct-common/artifactId
/depency
depency
/groupId
artifactIdspring-boot-starter-web/artifactId
/depency
depency
/groupId
artifactIdspring-boot-starter-test/artifactId
scopetest/scope
exclusions
exclusion
/groupId
artifactIdjunit-vintage-engine/artifactId
/exclusion
/exclusions
/depency
/depencies
/project
抽取用到的版本号到properties,这里抽取common模块的依赖版本。到这里最外层主pom的内容是这样的。?xmlversion="1.0"encoding="UTF-8"?
projectxmlns=""xmlns:xsi=""
xsi:schemaLocation=""
/modelVersion
packagingpom/packaging
modules
moduleproduct-common/module
moduleproduct-web/module
/modules
parent
/groupId
artifactIdspring-boot-starter-parent/artifactId
/version
relativePath/!--lookupparentfromrepository--
/parent
/groupId
artifactIdspringboot-module-demo/artifactId
/version
namespringboot-module-demo/name
descriptionDemoprojectforSpringBoot/description
properties
/
/
/properties
depencyManagement
depencies
depency
/groupId
artifactIdproduct-common/artifactId
version${}/version
/depency
/depencies
/depencyManagement
build
plugins
plugin
/groupId
artifactIdspring-boot-maven-plugin/artifactId
/plugin
/plugins
/build
/project
看似完美,重新Build-BuildProject,发现一切正常,运行发现一切正常,访问正常。
访问接口
打包编译好了,终于到了最后一步了,你感觉到胜利的曙光已经照到了头顶,反射出耀眼的光芒。接着就是mvnpackage。
[INFO]springboot-module-demo..SUCCESS[2.653s][INFO][2.718s][INFO][INFO]------------------------------------------------------------------------[INFO]BUILDFAILURE[INFO]------------------------------------------------------------------------[INFO]Totaltime:6.084s[INFO]Finishedat:2020-03-19T08:15:52+08:00[INFO]FinalMemory:22M/87M[INFO]------------------------------------------------------------------------[ERROR]:spring-boot-maven-plugin:2.2.5.RELEASE:repackage(repackage)onprojectproduct-common::spring-boot-maven-plugin:2.2.5.RELEASE:repackagefailed:Unabletofindmainclass-[Help1][ERROR]
ERROR让你伤心了,但是你还是从报错中寻找到了一些蛛丝马迹,你看到是spring-boot-maven-plugin报出的错误。重新审视你的主pom发现build编译插件用到了spring-boot-maven-plugin。
/groupIdartifactIdspring-boot-maven-plugin/artifactId/plugin/plugins/build
略加思索后将这段移动到web模块的pom,因为这是SpringBoot的打包方式,现在放在主pom中所有的模块都会继承到,那么对于common模块来说是肯定不需要的。
移动后重新打包,不管你是运行命令mvnpackage还是双击IDEA中的maven管理中的package,想必这时候你都已经打包成功了
IDEA打包
在web模块下的目录target里也可以看到打包后的jar文件。可以使用java命令直接运行。
$\springboot-module-demo\product-web\_________/\\/___'_____(_)______\\\\(()\___|'_|'_||'_\/_`|\\\\\\/___)||_)|||||||(_||))))'|____|.__|_||_|_||_\__,|////=========|_|==============|___/=/_/_/_/::SpringBoot::()2020-03-1908:33:03.337INFO15324---[main]:(C:\Users\83981\Desktop\springboot-module-demo\product-web\target\:\Users\83981\Desktop\springboot-module-demo\product-web\target)2020-03-1908:33:03.340INFO15324---[main]:Noactiveprofileset,fallingbacktodefaultprofiles:default2020-03-1908:33:04.410INFO15324---[main]:Tomcatinitializedwithport(s):8080(http)2020-03-1908:33:04.432INFO15324---[main]:Startingservice[Tomcat]2020-03-1908:33:04.432INFO15324---[main]:StartingServletengine:[ApacheTomcat/9.0.31]2020-03-1908:33:04.493INFO15324---[main][Tomcat].[localhost].[/]:InitializingSpringembeddedWebApplicationContext2020-03-1908:33:04.493INFO15324---[main]:RootWebApplicationContext:initializationcompletedin1107ms2020-03-1908:33:04.636INFO15324---[main]:InitializingExecutorService'applicationTaskExecutor'2020-03-1908:33:04.769INFO15324---[main]:Tomcatstartedonport(s):8080(http)withcontextpath''2020-03-1908:33:04.772INFO15324---[main]:()2020-03-1908:33:07.087INFO15324---[extShutdownHook]:ShuttingdownExecutorService'applicationTaskExecutor'
-U强制刷新install安装到本地仓库$\=true-Ucleaninstall
重新引入发现没有问题了。
文中代码已经上传到Github:niumoo/springboot